
Efficiency Tools for Editing
I’m always trying to find ways to improve how quickly I can work (without sacrificing quality, of course). Efficiency tools allow me to not only edit faster but also automate repetitive tasks, thereby letting me focus on the processes that require deep thinking. While some of the things I list may be more relevant for professional editors in our work with clients, many of them are helpful for writers too.
Here are some of my favorite tips and tools for editing more efficiently. Please note that I’m a PC user who uses Microsoft 365, so some of the steps I outline might look different depending on your OS and Word version.
Word tricks
Word has many keyboard shortcuts already assigned, so it’s great to familiarize yourself with built-in shortcuts if you’re not aware of them already. In addition to these keyboard shortcuts, here are some Word tricks that can boost your efficiency:
Insert an em dash (—): Since keyboards somehow don’t have an em dash key, I created one by assigning an em dash to one of my function keys (F11, to be exact). Here’s how you can do the same in Word: Insert > Symbol > More Symbols > Special characters (second tab) > Em Dash (top of the list) > Shortcut Key > choose a single key or a combination of keys > Assign.
Toggle between showing all markup and no markup: Because I use Track Changes when editing client work, I need to toggle between showing all markup and not. I find it too confusing to work while seeing all the markup, so I make my edits where I can’t see them. However, at times I need to check how things look in the marked-up view, so I have to be able to switch between them easily. To do so, I created a keyboard shortcut to make changes visible or invisible. Otherwise, I’d have to click between All Markup and Simple Markup each time. Here’s how to assign this shortcut: File > Options > Customize Ribbon > Keyboard shortcuts: Customize > Categories: Review Tab (left column) > Commands: ShowInsertionsAndDeletions (right column) > Press new shortcut key > choose a single key or a combination of keys > Assign.
Use New Window to compare/work on two versions of the same document: Thanks to my editor friend Karen Wise, I learned an even better way to see my editing markup without toggling back and forth between showing it and not! The key is to use the New Window function in Word, which allows you to open a second window of the same document so you can see them at the same time. I use this to view two windows of the same document I’m editing, one with all markup showing and one with no markup showing. I edit the version without markup showing, and all those changes immediately appear on the version with all markup showing because they’re the same document. If I need to check how the marked-up version looks, I just glance over at the window with all markup—no toggling, and no clicking between All Markup and Simple Markup. If I don’t like how my edit affected the markup, I can make changes to the marked-up document, which will reflect back in my no-markup window.
You can find New Window under the View tab. Then you click View Side by Side so you can see the windows next to each other (adding Synchronous Scrolling if you’d like), then toggle off the markup on the window you want to work on.
Here’s a screenshot of what this looks like:
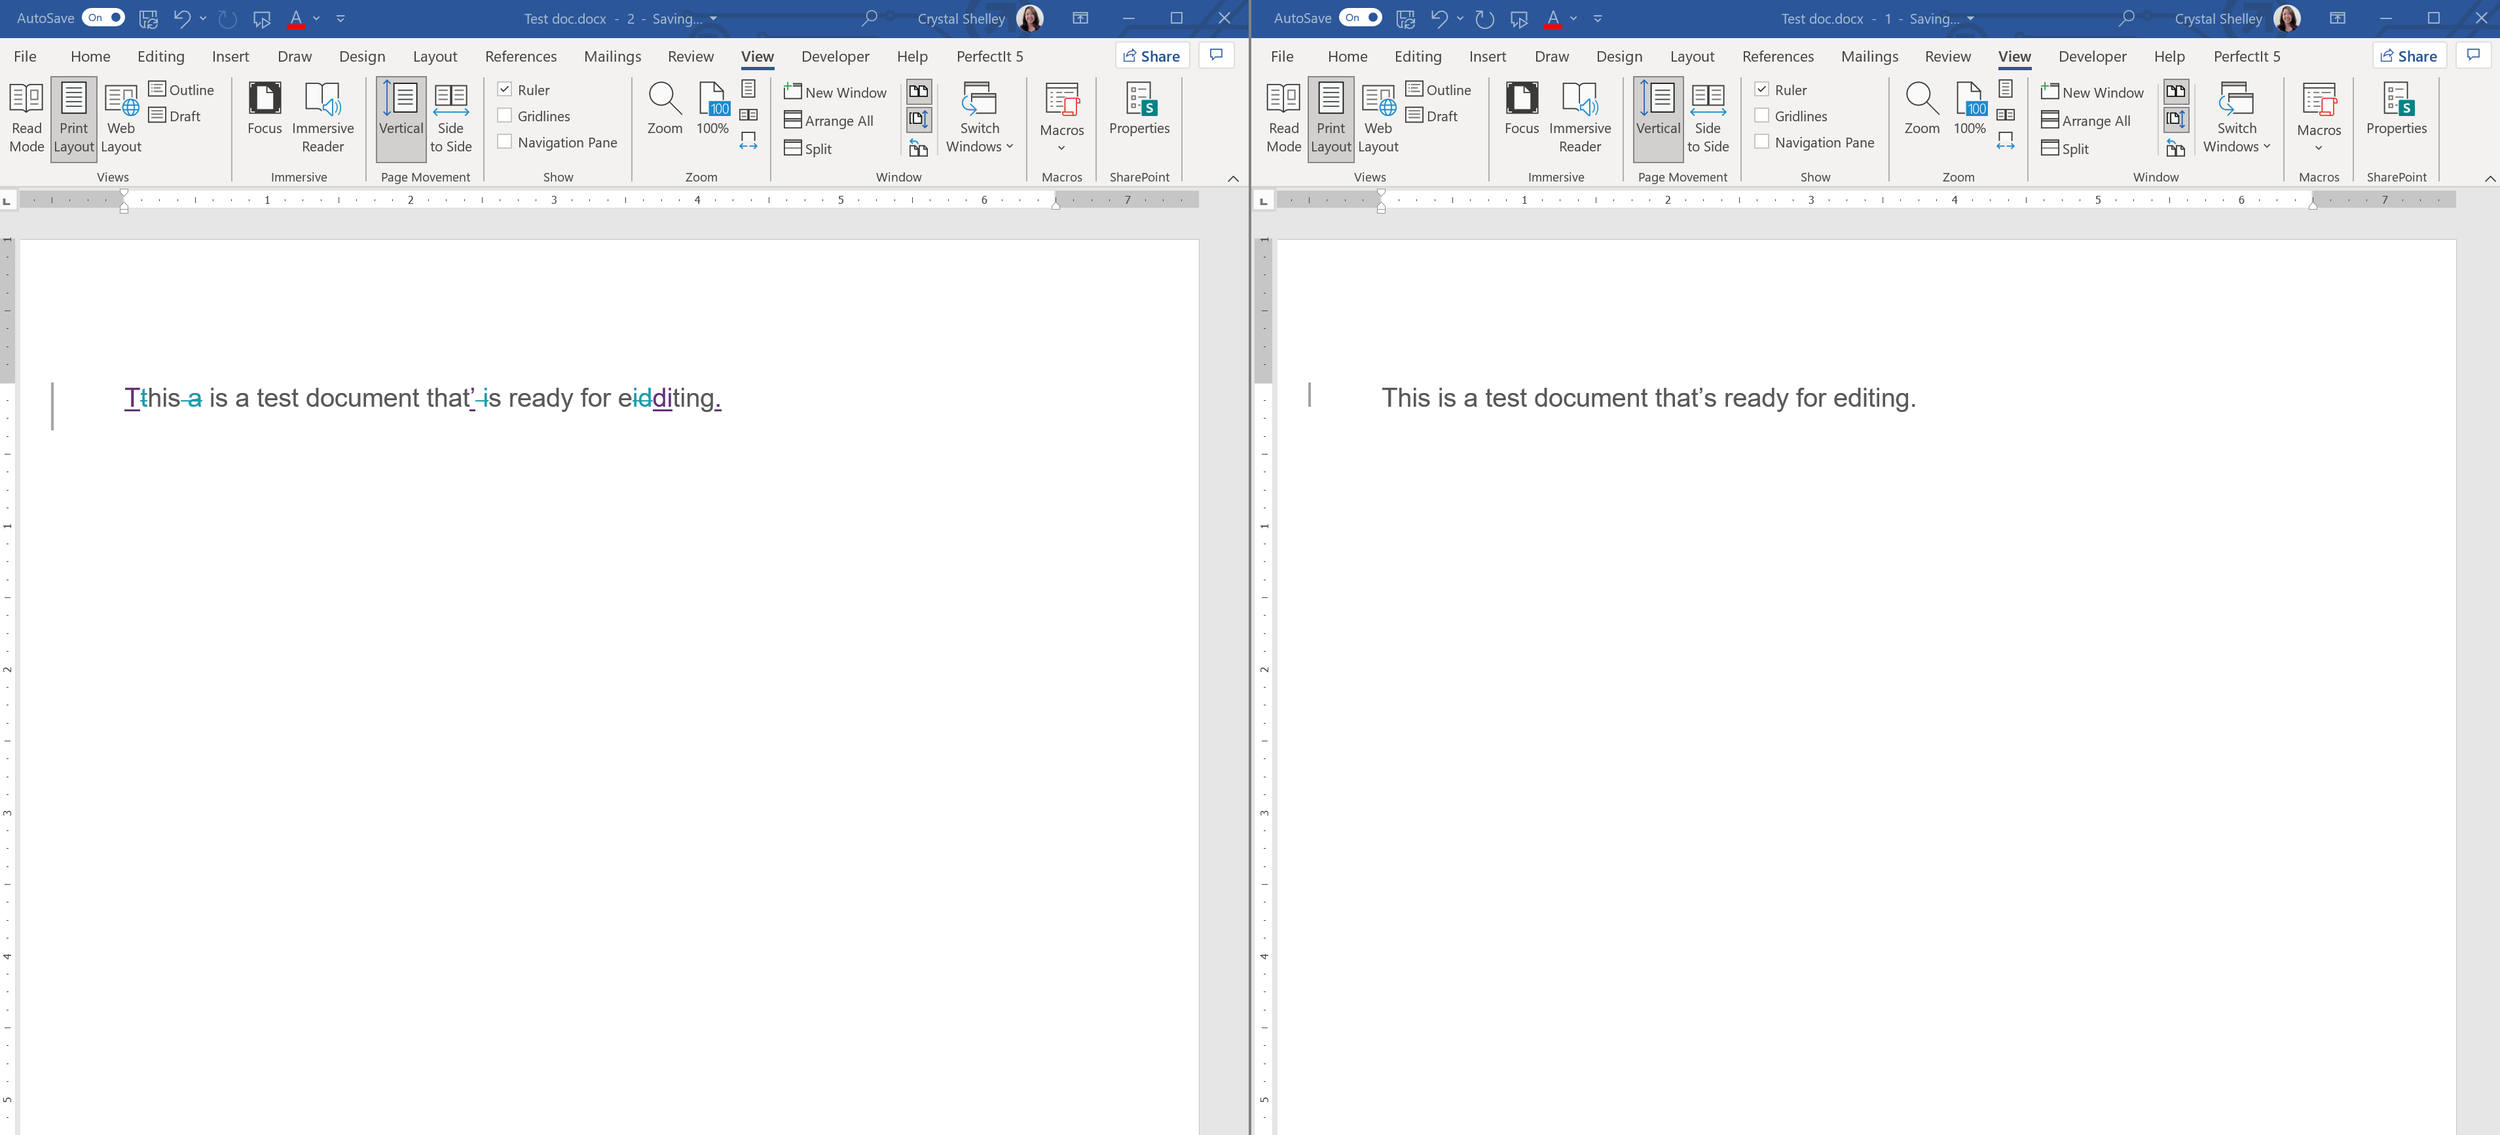
Two versions of the same document using the New Window feature in Word
And here’s a video where I talk through the steps of how to do this and what it looks like in practice:
A video walkthrough of how to use New Window in Word
Using New Window is also a great way to search for things in a document without losing your place in your edit. If I want to check whether a quote appeared earlier in the manuscript, I can search in the window I’m not actively working in, so I’ll always know where I left off in my edit. I’m sure there are other ways to use New Window that I’m not even thinking of, so if you have any tips, please leave a comment!
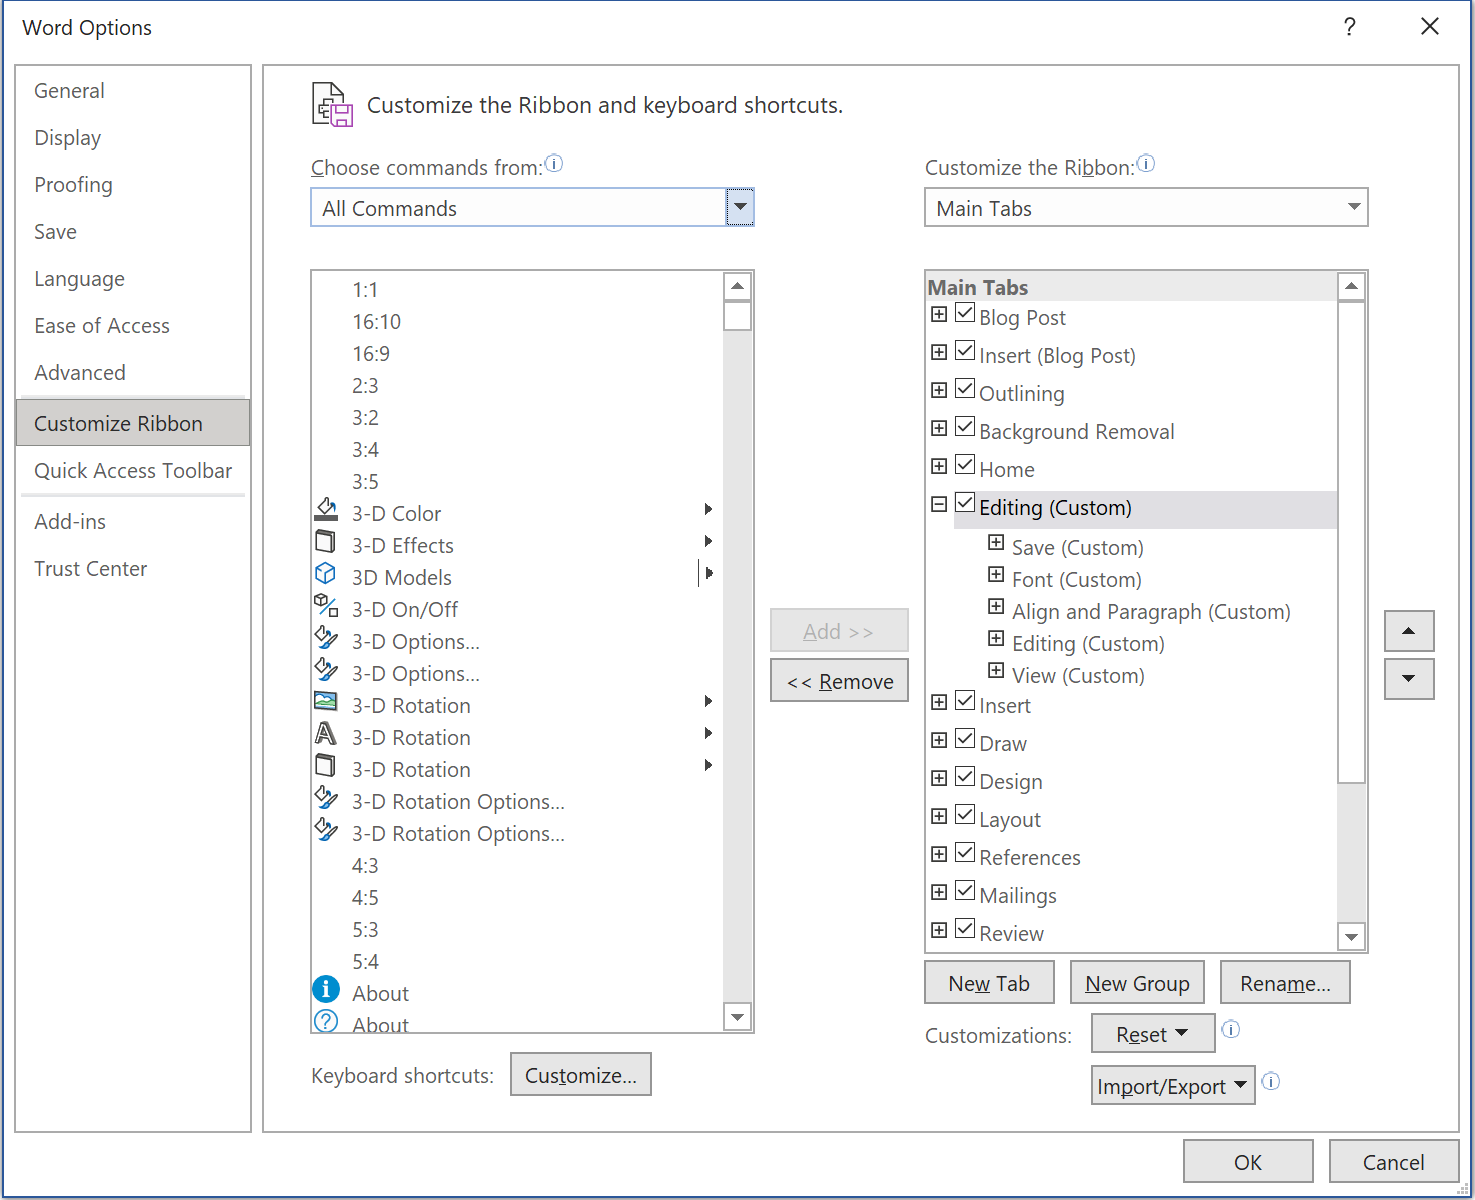
Word’s menu for customizing the ribbon of commands
Customize the Word ribbon or create your own ribbon tab: Another trick is to create a custom tab in the Word ribbon. Rather than clicking between the Home tab for formatting and styles, Insert for adding a page break, Review for the word count and Track Changes, and View for New Window and macros, I put everything I need in one tab I call Editing, which means no more hunting for commands in various tabs.
Here’s how to create a new tab:
Right-click anywhere on the existing Word ribbon and choose “Customize the Ribbon.”
In the left column, you’ll see the commands you can choose from. It defaults to “Popular Commands” in the dropdown menu, but you can change this to “All Commands” if you want to see everything. In the right column, you’ll see the Main Tabs in your existing ribbon.
Click New Tab underneath the right column, which will populate both a new tab and a new group (you have to have a new group underneath a new tab). You can rename tabs and groups by clicking on the Rename option.
Drag and drop your New Tab to whatever position you’d like it to be in your ribbon. My Editing tab is underneath Home in the list, which puts it to the right of the Home tab.
In the left column, select the commands you want to have in your custom tab by selecting them one by one and clicking the Add > > button in the middle of the two columns. Remove them by clicking the < < Remove button.
You can create groups to group similar functions, but you also don’t have to have groups.
Once you’re finished, click OK, and you should see your new custom tab on your ribbon!
Note: The icons will be large, but you can make all icons in a group small by right-clicking the group in the Customize menu and selecting “Hide Command Labels.” You can’t mix large and small icons in a group without doing custom XML.

My custom Editing tab in Word
The screenshot above shows what my custom Editing ribbon looks like. Here are the commands it has:
Save group: Save and Save as
Font group: Font Settings, Font, Font Size, Grow Font, Shrink Font, Bold, Italic, Underline, Text Highlight Color, Font Color
Align and Paragraph group: Text Styles, Align Left, Center, Align Right, Paragraph, Show/Hide Editing Marks, Line and Paragraph Spacing, Insert Page Section Breaks
Editing group: Track Changes, Previous [comment], Next [comment], Accept Revision, Reject Revision, Spelling & Grammar, Word Count, Find, Replace
View group: New Window, View Side by Side, Synchronous Scrolling, Macros
Find and Replace
I often fix formatting issues in manuscripts, and many of these can be done using Find and Replace in Word. These are the searches I run in every edit that help me find (and fix) formatting issues.
To remove manual tabs, which I can then change to first-line indents:
Find: ^t
Replace: (leave blank)
To remove line breaks, which I can then change to first-line indents:
Find: ^l (lowercase L)
Replace: (leave blank)
To find straight double quotes and replace them with curly ones:
Find: ^34
Replace: “
To find straight single quotes/apostrophes and replace them with curly ones:
Find: ^39
Replace: ‘
You can also use ^$^p to find missing punctuation marks at the end of sentences. (Many thanks to James Gallagher of Castle Walls Editing for this tip.)
Word macros
Macros are tools designed to automate tasks, and Word macros make me much more efficient as I edit. They allow me to use fewer mouse clicks and keystrokes to execute certain commands, such as deleting punctuation marks, capitalizing or lowercasing letters, and switching the placement of words. I previously wrote an in-depth post about macros, including my favorite ones, and there’s also a video showing what my macros do for me. I don’t want to edit without them anymore.
Text expanders
Text expanders are programs that let you save pieces of text and insert the saved text anywhere you want. Two popular ones are TextExpander and Phrase Express. I save text I would otherwise be typing over and over again. Then whenever I need it, I type the associated shortcut to insert that text. Here are some examples of when I use it:
Comments: If I find myself typing the same comment in multiple manuscripts, I save it in my text expander. For instance, I have a saved comment that explains why I’ve changed “further” to “farther.” I can simply type /further (the shortcut I’ve assigned to it) in a blank comment, and my explanation populates. I also have multiple comments saved that explain recommendations related to conscious and inclusive language, many of which I share in my Conscious Language Toolkit for Editors.
Emails: When emailing with clients or other editors, I often type similar responses, so it’s convenient to have a general template saved for each one. For example, I have text saved for responding to an initial inquiry, checking in one week before a project’s scheduled start date, and returning a completed edit.
Miscellaneous shortcuts: I also have shortcuts for miscellaneous things, such as my website URL and my bio. While I have a Word shortcut for an em dash, that doesn’t help when I want an em dash in an email or a tweet. I also don’t have a convenient number pad on my keyboard, so I don’t want to use an ALT shortcut. Therefore, I have an em dash saved in my text expander that I can insert by typing /m.
Until I tried using a text expander, I had a hard time picturing what it really did, so I created this video to show it in action. (There’s an error in my comment on gender-neutral language, where I equate police officer with mankind, which obviously doesn’t work. This has since been fixed.)
A video demonstrating what a text expander can do
Templates
I love a good template to make my life easier. In addition to the scripts I’ve saved in my text-expanding tool, I use templates for my client proposals, invoices, and editorial reports. In my editorial report, I have stock language that’s preloaded, and if it’s not relevant to the report, I can simply delete it.
PerfectIt
PerfectIt is a powerful program that checks for consistency within a document and helps editors make sure the writing follows the designated style guide and spelling. I include this as an efficiency tool because it has helped me make changes quickly, such as converting British English spellings to US English. It's saved me a lot of headaches, and it has caught spellings I would’ve missed otherwise.
Final thoughts
Being more efficient while editing (and writing) can help save time, energy, and brainpower. I don’t know about you, but those are all positives for me. What tools help you be more efficient when you’re editing?
A previous version of this post was published on November 4, 2021. It was updated on September 5, 2023, with information on using New Window in Word and customizing the Word ribbon.